If you're not familiar with CK12.org, it is a math- and science-centric site with tons of learning activities and resources for all grade levels. Recently (a couple months ago) they announced their integration with Google Classroom. To do so-- find a lesson you like, click the Share button, choose Email, and you'll be taken to a prompt that includes the share to Google Classroom option. So swell!
Find the arrow at the bottom right of the resource you want to Share, choose Email and then choose Google Classroom to easily share that component with your students on Classroom.
Classroom discussions are as tried and true as any classroom practice. Additionally, by giving students the opportunity to write/type their response to discussions and share them with their peers, they become not only accountable for knowing the material, but engaged in critical thinking as they examine their knowledge or opinion of the topic from different points of view.
To this end, I recently came across the Collaborize Classroom site, designed for grades 1-12. This resource allows you to engage your students in collaborative discussions. You can set up your own website; students then go to your newly created URL and become part of your online collaborative classroom. However - isn't this exactly what our Schoology Discussions and Google Classroom allows us to do? Sure is. So--here's a bit of a hack to this concept. Go to the Library area and you can dig into questions by subject or grade level. Here you'll find thought provoking questions you can post to your Schoology Discussions board, Google Classroom, or for lower grades, simply have an oral group discussion (an example from the site is below). The site encourages you to sign up with a classroom roster, but you can certainly peruse their Library for topic ideas.
In our selection, Rainsford and General Zaroff believe it is hunting, both humans and animals that is the most dangerous game. But, in our society what is the most dangerous game we, as humans, play? We play a lot of different games. We play sports (football, hockey). We have wars, date, and try to meet new people. Think about the “game” in our society that can burn us the most?
Instructions:
What is the most dangerous “game” in our society? In the reply box below describe the “game” that you believe is the most dangerous in society and convince our group of your position. Once you have posted your response, read and reply thoughtfully to at least 2 other members of the class. Compliment strong additions to the list, ask questions, and build on ideas shared.
Remember:
This is meant to be a persuasive. You are to make me believe that your “game” is the worst we as a human race come in contact with.
Great blog post from http://www.teachthought.com/technology/the-bare-minimum-of-technology-integration/
I do hate the word 'should', however; rather, 'could' is a better verb.
Many of our teachers have tried at least one of these. Great job to all our staff for embracing technology, rolling with the punches, and SHAKING IT OFF!
The Bare Minimum Of Technology Integration
The Bare Minimum Of Learning Technology
by TeachThought Staff
What is the bare minimum of learning technology integration in a classroom?
Does it depend on nation, grade level, or content area? Socioeconomic status? Culture? Prevailing local technology use?
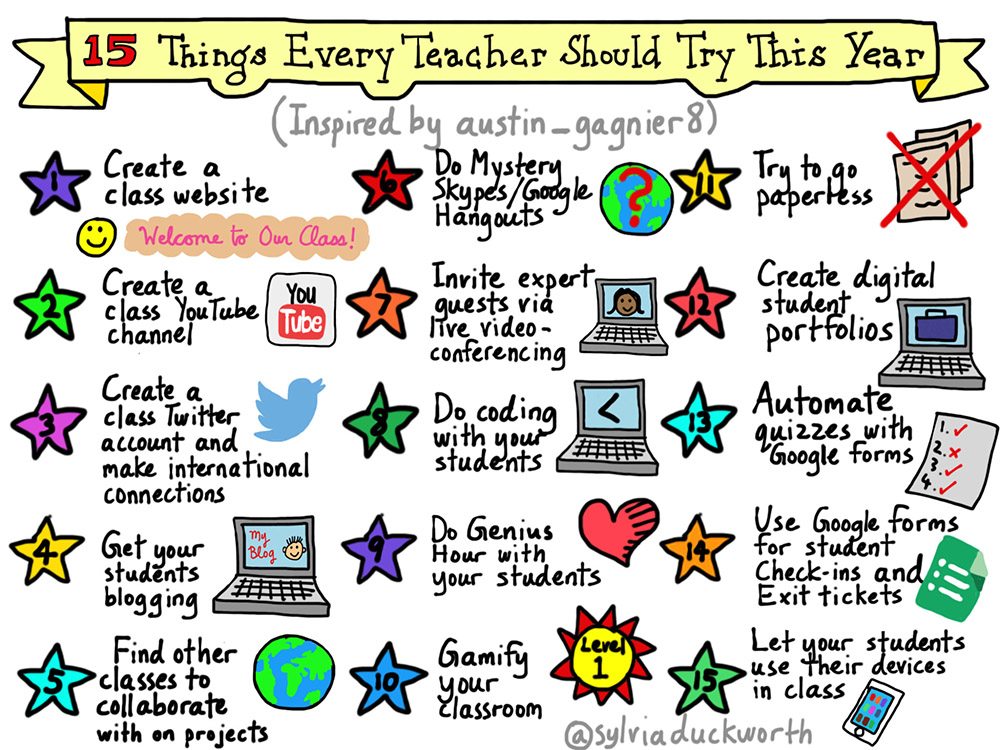
Though many teachers remain against reckless #edtech integration, the conversation is clearly shifting from should technology play a central role in the learning process to how should technology be used to promote learning? Inspired by a list she saw from @austin_gagnier8, @sylviaduckworth set out to itemize 15 things every teacher should try this year. Working her graphics magic, the above image is the result.
But while the original title of the image (and the collection of ideas it illustrate) works well, looking at it more closely, it was dominated by technology use–less about planning and learning models and teaching strategies and grouping activities or unit planning templates, and more about technology.
In that light, we felt like it represented another kind of idea–a bare minimum of technology integration in an average classroom. What might be considered a kind of basic standard for education technology in 2016? In theory, it’s not necessary to have any degree of education technology at all, though even that depends on your content area’s academic standards. (Here is exactly what the Common Core standards say about technology, for example.) And though numbers 5, 9, and 10 don’t absolutely require learning technology, they’d be all the better with its (strategic) integration.
But in 2016, it’s becoming more and more difficult to (rationally) avoid its application.
15 Examples Of What Could Be Considered The Bare Minimum Of Learning Technology
Create a class website
Create a class YouTube Channel
Create a class twitter account and make international accounts
Get your students blogging
Find other classes to collaborate with on projects
Sign up to take a virtual field trip with your class with Skype Fieldtrips. Teachers choose a trip from a variety of subject areas: animals, American Indians, authors, museums, etc.
Just sign up for a field trip, and sign in to Skype or create a new account. Your students will be able to talk to a live expert: collaborate, communicate, use critical thinking skills, and flatten your classroom--all in one fell swoop.
You can also sign up for a Mystery Skype tour. Students ask questions to find out where in the world you are Skyping to (I know, Sheri; don't end sentence in a preposition). You can also sign up to have YOUR class be the Mystery location.
Elementary: From what I gather, many of you are choosing to keep your students in the classroom more this year than in years past. (High School: Lots of great tools in this video for you as well)
To that end, I came across this video from the S'More Technology blog that speaks exactly to that format. It's 20 minutes long, but well worth the time!
So many great ideas, including many suggestions that teachers here are already using.
Some highlights:
Using Padlet to capture student artifacts (videos, text, links, photos) all gathered on one wall on which students can collaborate and create. padlet.com
Using Voice - apps like Vocaroo capture student voice, as many students have more to say than write;) Vocaroo.com. Also useful if you want to include your recorded instructions at your centers. You can grab the link from Vocaroo and paste in your Google Classroom stream.
Student-centered news and stories: Sites like Newsela provide news stories at various lexile. Each lexile has it's own URL, so can assign individual stories to your learners based on their lexile.
Google Slides: Have students create a Google Slide, or assign through your Classroom. The Slide becomes their ongoing Journaling throughout the year. Each slide is a day of the week. Or, have one Google Slide show and student are assigned one slide on which to provide feedback or a vocabulary word, etc. Then, you have one Slideshow to share with the entire class, and each had a part in making it.
So many more great ideas in that short video. I encourage you to subscribed or bookmark his blog too: learninginhand.com
If you have any upcoming lessons, or ideas, or are thinking, "I wish I could do this (better)", please let me know!
As he states, "Centers don't always need tech to be successful"
However, if you want to incorporate some, these suggestions are a good way to start.
I hope that when we start thinking about the vast capabilities that our Chromebooks and iPads will allow us next year, a feeling of panic and anxiety doesn't set in. Think about your classroom. Create instructional goals for your students, and we will work with the technology to support those goals.
Examples:
In my class I want more time to work with students
In my class I want my students to write better and provide feedback
In my class I want to assess student understanding without having to rely on grading
In my class I want students to collaborate on their assignments
Start with:
In my class...
My students struggle with...
The biggest instructional need in my class is...
Guidelines for creating these goals:
1. Be specific
2. Focus on learning, NOT technology
3. Think in terms of a 1-year timeline.
We can then tie technology to those instructional goals. Technology is here to help you reach your classroom and teaching goals; not replace your teaching with a computer :)
You have Atomic Learning set up with your district username and password. Use it! It's a vast resource of not only specific apps, but also pedagogical training, and more.
As you know, a huge movement exists toward gamifying education. Everything from Legos to Minecraft challenge students to think critically while rewarding their efforts.
Some resources for gamifying different subject areas: https://askatechteacher.wordpress.com/2013/05/03/15-great-simulations-to-gamify-your-class/
It organizes all those crazy ed tech apps you've heard about into types - collaboration, content, curriculum, etc. Shows you what the app does and ideas for classroom use.
Swell!
http://ednak.com/
From the blog http://usingeducationaltechnology.com/:
Summer is rapidly approaching, and as we all know, teachers DO NOT take the summer off! We are constantly updating curriculum, researching new teaching methods, and finding cool tools to increase engagement in our classrooms.
A few weeks ago, I stumbled upon an EdTech GEM, Ednak.
Ednak includes dozens upon dozens of amazing educational technology tools, complete with instructions and ideas for using the tools.
Ednak is incredibly organized, breaking down tools by a variety of different categories. Learning Management System, Collaboration Tools, Content Tools, Mobile Learning tools, and so much MORE!
Ednak is so simple to navigate and 100% FREE! Teachers can create an account and can then curate and share tools.
Add Ednak to your summer “to-do” list and find awesome tools for your students!
As you know, Schoology is our new Learning Management System (LMS). I have heard from many teachers at the high school that are feeling overwhelmed with yet another new initiative.
Understandable.
Please know that Schoology is something we are vested in and dedicated to, making the most of this robust resource for our teachers.
Nowthen...
Remember to use our proprietary site to login as you are able to log in with your Gmail credentials: pierz.schoology.com
The main page that opens up is Updates that will be pushed out by administration - updates, news, etc, as well as Updates from any blogs you follow. You may also notice a number next to your
Subscriptions (a place where you can access all the Schoology-based blogs) on the left. All Schoology users are automatically signed up for the Schoology blog (not of my doing, but that of Schoology). There is a lot of good information and teacher-shared resources, questions and thoughts here. You, too, are able to post questions and answers on this blog.
To create your Course:
From this main area, find the Courses tab at the top->Create.
You will be prompted by a pop-up screen to begin filling in your course information. Don't worry about Course or Section Codes. You will want to name your Course Section, however.
Remember, create one Course and then you will be able to Copy the Course and assign different section numbers without having to re-create every. single. section.
You will want to organize your course by Folders. I recommend the first folder be labeled something like Course Information where you'll house the syllabus, your course hours, and your contact information. From there, you can organize with folders by course unit...weeks...chapters...
Organizing each section by folder helps keep your assignments in order and allows you to use the Student Completion function. As you start to add Resrouces to your Course Folders, you'll see the Student Completion check box. This allows you to determine which components of that folder need to be completed first, second and so on.
If you find yourself wanting to integrate a project into a lesson, but not sure where to start, look no further than that fantastical resources at bie.org. Search by subject area, grade level, common core standard, and even the level of media (interactive or view-only?).
Twitter is a lot of...noise. Hashtags work like magnets (love that analogy) to pull in all relative content to a single feed. Explained better here: http://www.teachthought.com/twitter-hashtags-for-teacher/
Note the plethora of hashtags recommended in the article. Twitter is a great place for professional development, curriculum/class resources, ideas, strategies.
I'd also love to create a hashtag for Pierz Schools, and get everyone involved in taking pictures of their day, their sporting event, their extra-currciculars...and use Twitter to display our school pride.
To Tweet out something great about Pierz Schools, use the hashtag #PierzPioneers!
YouTube is awesome - millions of videos on a plethora of subjects at your fingertips! The bad? The creators of that content can pull those links at any time, leaving you scared, alone, and wondering where to turn...
No fear. This quick video will show you how to download your favorites. Save them to your Google Drive for anywhere/anytime access.
This list is from Vicki Davis through Edutopia, but many of these you'll recognize from our Tech Tuesday sessions! Hit the link below to read her personal that made the case for her use of formative assessments in her classroom (and follow her @coolcatteacher). Also, GoFormative.com and ExitTicket.com...
Update: I'd like to add a newcomer, Quizizz.com. This site takes it a bit further than Kahoot!, as students can play against eachother from anywhere, keep track of points they rack up based on how fast they answer the questions, and review incorrect answers after the quiz is complete. Make your own reviews, or choose from a plethora of teacher-created quizzes. Upon starting your quiz, you generate a code that your students can enter at www.quizizz.com/join
Learn the strengths and weaknesses of each tool. You’ll need several to meet every classroom situation. These are my fab five tools for formative assessment.
1. Socrative
Socrative can be used for quick quizzes and also on the fly, as I've already shared. Here's another feature. Before class, I create quizzes that we can play as a game called Space Race. The website automatically divides the class into teams. Kids know what color team they're on and can look at the rockets racing one another on the board. I don't always record the grade, particularly when I know I have more teaching to do.
The advantage of Socrative is that it gives me percentages that I can use as a grade if we're ready for that. You can even use it for traditional quizzes if desired.
2. Kahoot
Kahoot lets us build fun quizzes. Students use computers, cell phones, or other devices to join in the game. You can create flashcards for review. You can also embed videos and use Kahoot as part of the teaching process, or students can create review games to share. One disadvantage is that students can use aliases. While I can see overall how the class is doing, unlike Socrative, I can’t see the patterns of which unfamiliar nickname is struggling.
Otherwise, I knew this one was a winner when I finished ten minutes early on the last day of school and one class asked to play SAT vocab review in Kahoot.
3. Zaption
I’m in-flipping my class and using videos. But just as we know that it's better to ask questions throughout the text rather than only at the end of the chapter, you should also ask questions after a topic is covered in the video and not wait until the end. Zaption lets you embed questions within the video. Students can't move forward in the video until they can correctly answer the question. Whether you’re flipping your classroom or in-flipping, this is a powerful tool.
You'll need to upgrade your Zaption plan to embed it in your learning management system, but you can test it out on their site for free to see if it works for you.
4. Backchannel Chat Tools
Backchannel chat -- a live chat that accompanies class discussion -- is a great way to do exit ticket activities. While these chat tools aren't anonymous,Chatzy, Today’s Meet, or Ning can be powerful. Students can take notes as you teach together, and you can check for understanding by having them type answers to questions. Another riff on this would be group note taking inGoogle Docs. (If you need to have anonymous chat, you could set something up in Google Forms.)
One tip: If I ask a question and want everyone to answer, my rule is that you cannot repeat a previous answer -- each response must be slightly different and add something to what we know. Afterward, export the chat and share it with the class as notes for the day.
5. No BYOD? Plickers and Mobile Scanners Rock
But what if you have no computers, no cell phones, no nothing? Do you have a smartphone or tablet? If so, you've got two simple answers.
For verbal questions: Log into Plickers and create a page for each student. This tool will code in the student's name and answers. Hand each student their plicker card and ask a question. The student will hold the card up in the direction of their answer. Looking at the class through the camera on your smartphone inside the Plicker app, you’ll see the name of each student and whether he or she got the answer right to the question you just asked! BAM! (Hat tip to Richard Byrne for teaching me about Plickers in a recent interview.)
For quick quizzes:QuickKey is one mobile scanning app for the iPhone. There are several others, such as ZipGrade and GradeCam. The disadvantage of this method is that your questions must be multiple choice. You print out the short form and students bubble it in. Use your smartphone to immediately know what students know with a snap of a picture.
Can You Teach Without Formative Assessment?
Test scores should never be a surprise. You don’t need to be a mind reader. You just need a formative assessment toolbox, and you need to use it every day.
They set up very quickly. You likely know from experience setting up a new computer means plugs and cables and a diagram with lines and arrows all over the place, DVDs to install programs and software and tools, maybe a couple of hours to get sound, mouse, keyboard, monitor, video, fax, printer, scanner, WiFi, router, external drives, headphones (have I missed anything) all working. That doesn’t include a few calls to your tech guru for assistance or a return trip to the store because something was left out of the box. With Chromebooks, you skip most of that. Instead of seven zillion pieces, they require an internet connection and a Google account. That’s it. I’m serious. Here’s the link that says that.
They boot up really fast–they claim ten seconds (which I have no data to disprove). Really, why wouldn’t they? They aren’t bringing up all those programs and bloat that traditional computers do. All a Chromebook wants to do is find the internet.
They work faster than traditional computers for the same reasons they boot up faster. There’s nothing slowing them down. The only limiting factor is the speed of the internet connection.
They awake from hibernation really fast, too–by most counts, as fast as an iPad.
They come with keyboards. Say what you want to about the iPad’s touch keyboard, but it’ll be a long while before people type ‘three pages in a sitting’ on that as is required by Common Core. Typing on iPads is more a method of getting from here to there. On the Chromebook, it’s the purpose, the goal, the communication. For me, as a writer, that’s a big deal.
Battery life well exceeds a laptop, equals an iPad. The reason: The Chromebook doesn’t have to work very hard. The heavy lifting is done in the Cloud.
They don’t have as much downtime because they are much simpler than traditional computers. Without all that software, they have less drivers and programming that confuses the heck out of the hardware as it’s trying to respond to your request.
Work done on a Chromebook is available in lots of places (not just the hard drive of one digital device). Students start work at school and pick it up at home without a hitch. Everything is automatically synced and saved–no work on the student’s part. Because it’s operated from the cloud. No forgetting paperwork at school or a log-in. For new learners, struggling to get technology while they’re learning science and math, this is irreplaceable.
They aren’t iPads, which means they can run flash, print without difficulty (well, not as easy as a desktop), toggle between programs/tools/tasks with ease, and multitask as easily as the most sophisticated ‘regular’ computers out there.
They cost less (in some cases, a lot less) than desktops, iPads, laptops–pretty much any other digital device in common usage in schools.
Maintenance is much simpler because everything is stored in the cloud. Beyond the log-in, there’s not much the local system needs to know about you. You log onto the Chromebook and then go to the Cloud to find programs, data, files, everything.
You don’t get those constant messages about what needs to be updated or what was updated or which program update didn’t play nice with something else on your computer so now you need to download the X47bj file from the publisher’s website and install it.
They’re easy to learn. If you know how to use the internet, you know 90% of what you need.
For your students, there’s not much of a learning curve with Chromebooks. Those who arrive in class with a general knowledge of iPads and Smartphones will have little difficulty with Chromebooks.
They are small and light-weight compared to a laptop which makes them more portable for students.
You can plug in flash drives and external drives to the Chromebook (not possible on iPads).
That nagging worry about viruses and malware being downloaded when you visit websites or download … stuff… Not a problem with Chromebooks. Since they don’t install any programs locally, viruses can’t be installed there either. I’m sure there’s some type of virus they can get, but not the type I spend way too much time worrying about.
But it’s worth repeating that they aren’t computers–not in the strict sense of what we’ve come to expect from a computer:
You can’t install software onto them. There’s no DVD drive and little storage space on the Chromebook’s hard drive.
You can’t download stuff from the internet to the Chromebook. That includes popular programs like Google Earth. Developers are busily building apps to replace software (because Apps will work without installing more than their icon and a few pieces of script on the host computer), but they’re not there yet.
They won’t run without a Google account. The good news is, that account is free as is everything that comes with it, like word processing, spreadsheet and presentation programs, email service, and more. You don’t pay for software unless you really must have your MS Word. Then, you’ll have to buy the cloud version (Office 365).
Since everything runs in the Cloud, if you can’t connect to the internet, you can’t use the Chromebook. You have to make the mental shift to keep your internet connection always up. Get a phone with a hotspot. Buy a separate hotspot. Some apps (including Google Apps) can run offline, but know which so you aren’t stuck on a cross-country plane flight with a digital book on your Kindle account you were planning to read through your Chromebook.
You have to start calling yourself a ‘Chromie’–that’s a Chrome user. You can ease into that.
So what are some tips for using this transformative tool in your classroom?
Be clear what the Chromebook can and can’t do. Then you won’t expect the impossible. (Note - at ISD 484, they can't print!)
It is sturdy–reinforced hinges, water-proof keyboard (waterproof everything), able to survive a drop from desk-height–but still teach students to handle it with care.
Taking screen shots is easy. (To take a screenshot of your current window, press Ctrl and . )
Get students used to shortkeys. They’re much faster. Here’s a big list of ones you’ll want to know.
It’s operating system (called Chrome OS) is Linux-based, not Windows. I won’t bore you with details on what that means–suffice it to say that Linux is a long-time, well-respected operating system. Just be clear that you’re not working with a Mac or Windows operating system. That will inform a lot of the little stuff you do along the way.
You’ll feel more comfortable using the Chrome browser than IE or Firefox.
Who you buy your Chromebook from will affect how much Cloud storage each user gets. This can vary from 100G to 1T. They’re both a lot of space–unless you’re going to do repetitive videotaping. A thirty minute video can take half a gig of space. OK, doing the math, that’s a lot of videos.
Chromebooks are platform agnostic. It doesn’t matter if students create documents in Macs or PC. Once they load it to their cloud storage, they can view it and/or share it.
Ever wish you could read the confusion on your student faces? What are they thinking? What don't they GET about this lesson/movie/discussion/chapter? Or, do you find yourself daydreaming of a tool that could capture student reactions and comments in a tangible format?
Hello TodaysMeet.com!
Todaysmeet.com is a website that allows you to create a forum page in a matter of seconds. Students go to the URL you've created and can instantly gain access with simply typing their name - no sign ups required for you or your students.
An English teacher at Westonka high school uses Todaysmeet.com as a backchannel for her socrative circle, with inner students answering pre-determined questions and the outer circle typing their responses and feedback to the inner circle's answers and discussions. Then, all comments are created in a transcript that students can study later and the instructor can use to grade participation points.
Quick tutorial
More ideas for use:
1. Have a conversation. Students can talk about anything in a TodaysMeet room, and often you’ll draw out the shyest, quietest students — the ones who would never raise their hand in class discussion.
2. Share links. Post the URL for a website you want everyone to visit. Links you post are clickable in TodaysMeet.
3. Ask questions. During a lecture, presentation or movie, if students are unclear about something, they can ask questions and get answers without interrupting.
4. Give examples. Looking for students to show how something relates to their life? Or how they would apply a new concept? Participation is immediate and much faster than raising hands to answer.
5. Take a poll. Ask for a vote among a couple choices and the results will be visually obvious in a matter of seconds.
6. Check for understanding. Ask a comprehension question and have students type the answer WITHOUT clicking “Say” (the button you use to submit your answer to the room). Then, if they all click “Say” on the count of three, you’ll see who understands and who doesn’t.
7. Gather feedback. Did your presentation make sense? Do students like changes to the school? What is really working in class? What would they like to see more of?
8. Gather anonymous feedback. If you want participants to be REALLY honest, ask them not to type their names (maybe just a letter or character, or the same thing for everyone) when they answer.
9. Create “rotating stories.” Create a TodaysMeet room with a story starter. Have each student add a new sentence to the story. (Or, have every student create a TodaysMeet room and start their own story … then have each student visit every other student’s room to add a sentence.) See where the story goes.
10. Discuss an event. The State of the Union speech. A movie relevant to class. A presentation in the auditorium. Host a behind-the-scenes quiet discussion.
11. Hold online office hours. Tell students you’ll be available at a TodaysMeet room at a certain time to answer questions.
12. Crowdsource details. When my Spanish classes and I make up stories in Spanish, I like to ask them for details to add — a character’s name, where the character goes, what a character does next. I can get suggestions from everyone in about 15 seconds (or less!).
13. Connect with other classrooms. Extend a discussion beyond the four walls of your classroom. Invite a class from down the hall, in another city, in a different country.
14. Connect with experts. Find an expert in the subject your class is discussing and see if he/she will engage with your students in a TodaysMeet room. You can have a guest speaker without the hassle of travel.
15. Host a contest. The first person who correctly posts in the TodaysMeet room wins!
16. Teach brevity. Students can easily get too verbose and use unnecessary words. Expressing thoughts in 140 characters is an exercise in simplicity.
17. Practice digital citizenship. TodaysMeet rooms are online spaces for discussion much like many social media sites. They are a safe place to post and then talk about the do’s and don’ts about engaging online.
18. Facilitate group projects. Students can post links to useful articles, relevant information and ideas they want to include in a group TodaysMeet room.
19. Create a club/team communications site. Post meeting cancellations and changes. Connect with parents. Save yourself tons of phone calls or text messages if everyone checks the group TodaysMeet site.
20. Have asynchronous staff/committee meetings. Host a discussion where participants can discuss when it’s convenient for them. Let everyone pop in to a TodaysMeet room throughout the day (or week) and wrap up the meeting at a predetermined time.
Topics include:
Encouraging the positive use of technology
Modeling responsible use
Digital Footprint: Everything is permanent, and nothing is private
Dangers of Distracted Driving
Sexting and Pornography
Respectful etiquette and cyberbullying
Violent Video Games


 Summer is rapidly approaching, and as we all know, teachers DO NOT take the summer off! We are constantly updating curriculum, researching new teaching methods, and finding cool tools to increase engagement in our classrooms.

